Discover the benefits of sweatbands for your fitness routine. Enhance your performance and stay comfortable with these stylish and functional accessories.

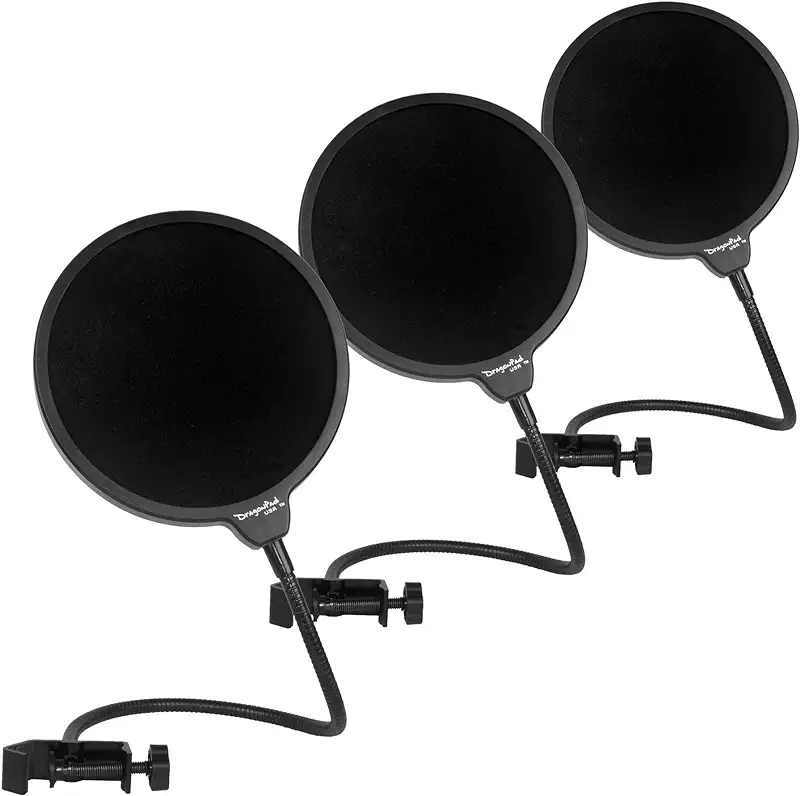
A pop filter is a device used in audio recording to reduce or eliminate plosive sounds, such as “p” and “b” sounds, that can create unwanted bursts of air hitting the microphone. These bursts of air can cause distortion and can be particularly problematic when recording vocals or spoken word.
Using a pop filter helps to minimize plosive sounds by creating a physical barrier between the vocalist or speaker and the microphone. The filter is typically made of a fine mesh material that allows sound to pass through but blocks the forceful bursts of air that cause plosives.
By reducing plosive sounds, a pop filter helps to improve the overall audio quality of recordings. Plosives can create unwanted distortion and can make vocals or spoken word recordings sound unprofessional. Using a pop filter ensures a cleaner and more polished sound.
Plosives can also affect the clarity of vocals by causing fluctuations in volume or tone. When a burst of air hits the microphone, it can create an uneven sound that is distracting to the listener. A filter helps to maintain a consistent and clear vocal sound.
Pop filters not only benefit the audio quality but also protect the microphone itself. The forceful bursts of air caused by plosive sounds can potentially damage the sensitive components of a microphone if they are not properly addressed. Using a pop filter acts as a shield, preventing any potential damage.
Pop filters are not limited to just vocals or spoken word recordings. They can also be used when recording instruments such as brass or wind instruments that produce bursts of air. By using a filter, these instruments can be recorded without the unwanted plosive sounds.

Nylon mesh pop filters are the most common type of pop filters and are widely used in professional recording studios. They consist of a fine nylon mesh stretched over a circular frame and are typically attached to a flexible gooseneck or clamp. Nylon mesh pop filters are effective in reducing plosive sounds while allowing the sound to pass through unimpeded.
Metal mesh pop filters are similar to nylon mesh pop filters but are made of a metal material instead. They offer similar performance in reducing plosive sounds but may have a slightly different tonal characteristic due to the material used. Metal mesh pop filters are often preferred for their durability and longevity.
Foam pop filters are made of a dense foam material and are typically used in more casual recording setups or for on-the-go recordings. They are less effective in reducing plosive sounds compared to nylon or metal mesh pop filters but still provide some level of protection against plosives. Foam pop filters are also more affordable and portable compared to other types.
Dual-layer pop filters feature a combination of both foam and mesh layers. The foam layer acts as the first line of defense against plosives, while the mesh layer provides additional protection. This type of pop filter offers enhanced plosive reduction while maintaining good sound quality.
When choosing a pop filter, make sure it is compatible with your microphone. Most pop filters come with adjustable clamps or goosenecks that can be easily attached to microphone stands or booms. Check the diameter of your microphone and ensure that the pop filter can securely attach to it.
Consider the material of the pop filter. Nylon mesh and metal mesh pop filters are the most common and effective options. Nylon mesh filters are more affordable and provide good performance, while metal mesh filters are more durable and long-lasting. Foam pop filters are a budget-friendly option but may not offer the same level of plosive reduction.
The size of the pop filter is also important. It should be large enough to cover the entire microphone capsule and provide adequate protection against plosives. A larger pop filter will generally provide better plosive reduction compared to a smaller one.
Consider whether you need an adjustable arm or gooseneck for your pop filter. An adjustable arm allows you to position the pop filter at the desired distance and angle from the microphone, ensuring optimal plosive reduction. This flexibility is especially useful for different recording setups and preferences.
Finally, consider your budget when choosing a pop filter. Prices can vary depending on the brand, material, and features of the pop filter. Determine your budget and find a pop filter that offers the best value for your needs.

Using a pop filter is straightforward and requires minimal setup. Follow these steps to properly use a filter:
Attach the filter to a microphone stand or boom arm using the provided clamp or gooseneck. Make sure it is securely fastened and positioned in front of the microphone.
Position the filter a few inches away from the microphone, ensuring that it covers the entire capsule area. The exact distance may vary depending on personal preference and the specific filter used.
Adjust the angle of the filter to direct the airflow away from the microphone. This can help further reduce plosive sounds and ensure optimal sound quality.
Once the pop filter is properly set up, start recording as usual. Speak or sing into the microphone while maintaining a consistent distance from the filter. The filter will effectively reduce or eliminate plosive sounds, resulting in cleaner and more professional recordings.
In addition to reducing plosive sounds, a filter can also help to minimize sibilance. Sibilance refers to the hissing or exaggerated “s” sounds that can occur during vocal recordings. These sounds can be distracting and can affect the clarity of the vocals. By creating a barrier between the vocalist and the microphone, a filter can help to soften and smooth out these sibilant sounds, resulting in a more balanced and natural vocal sound.
When recording vocals or spoken word, saliva and moisture from the mouth can accumulate on the microphone. Over time, this buildup can affect the performance and lifespan of the microphone. A pop filter acts as a physical barrier, preventing saliva and moisture from reaching the microphone and causing damage. This is particularly important for long recording sessions or when multiple individuals are using the same microphone.
Pop filters are designed to capture and diffuse sound waves coming from the front, while allowing other sound waves to pass through. This means that a filter can also help to reduce background noise, such as air conditioning, fans, or other ambient sounds. By minimizing background noise, a filter allows the focus to be on the main audio source, resulting in cleaner and more professional recordings.
In addition to protecting the microphone from saliva and moisture, a filter also helps to maintain better hygiene. The filter can be easily cleaned or replaced, ensuring that any bacteria or germs that may be present are not transferred from one user to another. This is particularly important in shared recording environments or when multiple individuals are using the same equipment.
A pop filter can also serve as a visual cue for proper microphone placement. By positioning the pop filter a few inches away from the microphone, it helps to establish the correct distance between the vocalist or speaker and the microphone. This ensures consistent sound quality and helps to prevent proximity effect, which can cause a boomy or muffled sound when the microphone is too close to the audio source.

While there are general guidelines for filter placement, it’s important to experiment and find the position that works best for your specific microphone and vocal style. Try adjusting the distance between the filter and the microphone, as well as the angle of the filter, to find the optimal setup for reducing plosive sounds.
Even with a filter, it’s important to use proper microphone technique to minimize plosive sounds. Avoid speaking or singing directly into the microphone and instead aim to slightly off-axis. This helps to direct the airflow away from the microphone and reduce the impact of plosive sounds.
When using a filter, it’s important to maintain a consistent distance from the microphone. This helps to ensure a consistent sound level and prevents fluctuations in volume or tone. Consider using a microphone stand or boom arm with adjustable height to easily maintain the desired distance from the filter.
To maintain optimal performance and hygiene, it’s important to clean the filter regularly. This can be done by gently washing the filter with mild soap and water or using disinfectant wipes. Allow the filter to fully dry before using it again to prevent any damage to the microphone or distortion in the sound.
Over time, the mesh material of a filter can degrade or become less effective in reducing plosive sounds. It’s important to regularly inspect the filter for any signs of wear or damage and replace it if necessary. This ensures that the filter continues to provide the desired level of protection and sound quality.
– Reduces plosive sounds and prevents distortion in recordings
– Improves audio quality by eliminating unwanted bursts of air
– Enhances vocal clarity and maintains consistent sound
– Protects the microphone from potential damage
– Versatile and can be used for various instruments
– Easy to attach and adjust for optimal positioning
– May require additional space and setup
– Not as effective as other methods in completely eliminating plosive sounds
– Some filters may affect the tonal characteristics of recordings
– Can be an additional expense in a recording setup
– “The pop filter has greatly improved the sound quality of my recordings. It effectively reduces plosive sounds and makes my vocals sound much clearer.” – John D.
– “I love using the filter for my podcast recordings. It’s easy to attach and adjust, and it has made a noticeable difference in the overall audio quality.” – Sarah G.
– “I’ve tried foam filters before, but they didn’t do much to reduce plosives. Switching to a metal mesh filter has been a game-changer. My recordings sound so much cleaner now.” – Mike T.
– “I was skeptical about getting a filter at first, but it has been worth every penny. It protects my microphone and eliminates those annoying bursts of air. Highly recommended!” – Emily S.

Q: Can I use a filter with any microphone?
A: Pop filters are generally compatible with most microphones. However, it is important to check the diameter of your microphone and ensure that the filter can be securely attached.
Q: Does the material of the filter affect the sound quality?
A: The material of the filter can have a slight impact on the tonal characteristics of recordings. Nylon mesh and metal mesh filters are commonly used and provide good sound quality. Foam filters may offer a slightly different sound character due to their denser material.
Q: How far should the filter be from the microphone?
A: The distance between the filter and the microphone can vary depending on personal preference and the specific filter used. It is generally recommended to position the filter a few inches away from the microphone to effectively reduce plosive sounds.
Q: Can I use a filter for instruments?
A: Yes, pop filters can be used for instruments that produce burst of air, such as brass or wind instruments. It helps to eliminate plosive sounds and ensure a cleaner recording.
Q: Can I DIY a filter?
A: It is possible to make a DIY filter using materials like pantyhose or wire mesh. However, these DIY options may not provide the same level of effectiveness and durability as professionally made filters.

In conclusion, a filter is a valuable tool for improving the audio quality of recordings. It reduces plosive sounds, enhances vocal clarity, and protects the microphone from potential damage. filters are available in various materials and types, such as nylon mesh, metal mesh, foam, and dual-layer. It is important to choose a pop filter that is compatible with your microphone and meets your specific needs.
Overall, incorporating a filter into your recording setup is a worthwhile investment that can significantly improve the quality of your recordings.
In summary, a filter is an essential tool for any audio recording setup. It helps to reduce plosive sounds and improve the overall audio quality of recordings. By using a filter, you can enhance vocal clarity, protect the microphone, and achieve a more polished sound. When choosing a filter, consider factors such as compatibility, material, size, adjustable arm, and budget.
Follow the proper steps to attach and position the filter for optimal results. Incorporating a filter into your recording setup will greatly enhance the quality of your audio recordings.
Using a pop filter is essential for any audio recording setup, whether it’s for vocals, spoken word, or recording instruments. In addition to reducing plosive sounds, a filter provides a range of benefits, including reducing sibilance, preventing saliva and moisture buildup, minimizing background noise, improving microphone hygiene, and providing a visual cue for microphone placement.
To use a pop filter effectively, experiment with placement, use proper microphone technique, maintain a consistent distance, clean the filter regularly, and replace it when necessary. By incorporating a pop filter into your recording setup, you can ensure cleaner, more professional, and higher-quality audio recordings.