Discover the benefits of sweatbands for your fitness routine. Enhance your performance and stay comfortable with these stylish and functional accessories.


Welcome to our blog post about the Hello Kitty toaster! If you’re a fan of the adorable Hello Kitty character and want to add a touch of cuteness to your kitchen, then this is the perfect appliance for you. In this article, we will explore the features and benefits of the Hello Kitty toaster, as well as provide some tips on how to use and maintain it. So, let’s dive in and discover why this toaster is a must-have for all Hello Kitty enthusiasts!
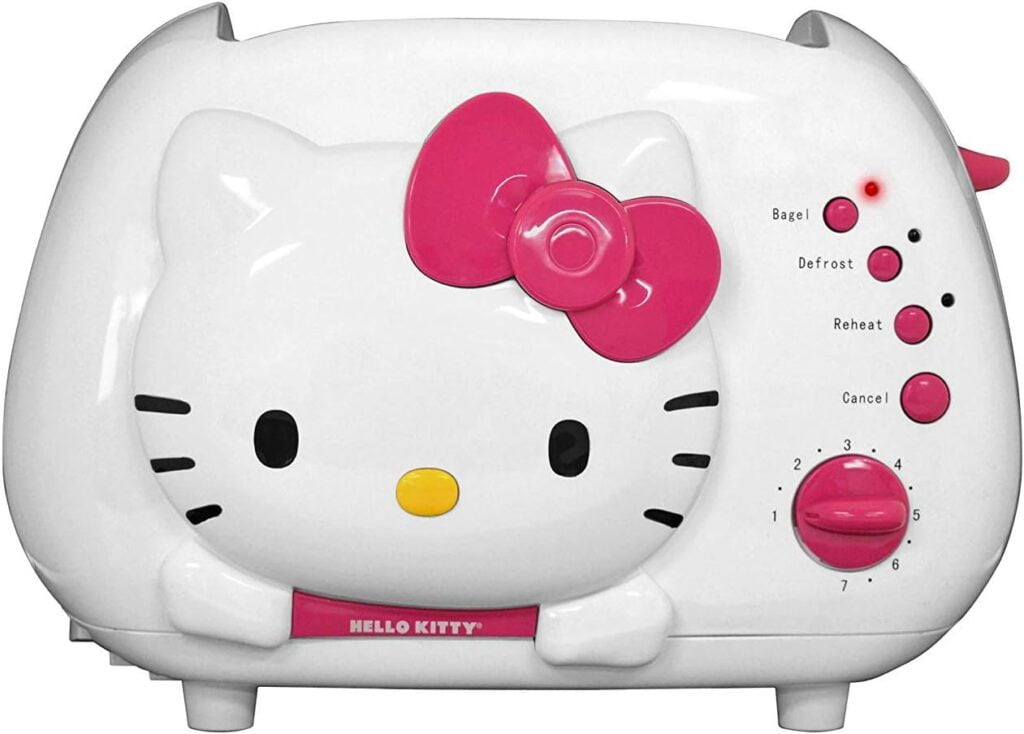
The Hello Kitty toaster is a small kitchen appliance that features the iconic Hello Kitty character on its exterior. It is designed to toast bread slices, bagels, and other bread products to perfection. The toaster comes in a variety of colors and designs, allowing you to choose one that matches your kitchen decor or personal style.
The Hello Kitty toaster offers several features that make it a great addition to any kitchen. These features include:
By adding the Hello Kitty toaster to your kitchen, you can enjoy several benefits:

Using the Hello Kitty toaster is a simple and straightforward process. Here’s a step-by-step guide to help you get started:
Start by plugging the Hello Kitty toaster into a power outlet. Ensure that the outlet is compatible with the toaster’s voltage requirements.
Next, adjust the browning control knob to your desired level of crispiness. For lighter toasting, set it to a lower number, and for darker toasting, set it to a higher number.
Take a slice of bread or a bagel and insert it into one of the toaster’s wide slots. If you’re toasting two slices, insert the second slice into the other slot.
Press down the lever or push the button to start the toasting process. The toaster will automatically lower the bread into the toasting chamber.
Once the toasting process is complete, the lever or button will pop up, indicating that your toast is ready. Carefully remove the toast from the toaster using a pair of tongs or oven mitts.
After using the Hello Kitty toaster, make sure to unplug it and allow it to cool down. Once cooled, remove the crumb tray and empty the crumbs into the trash. Wipe down the exterior of the toaster with a damp cloth.

To ensure the longevity of your Hello Kitty toaster and keep it in good working condition, follow these maintenance tips:
Empty the crumb tray after each use to prevent the buildup of crumbs, which can affect the toaster’s performance and create a fire hazard. Clean the tray with warm, soapy water and dry it thoroughly before reinserting it into the toaster.
When removing toast from the toaster, avoid using metal utensils, as they can scratch the non-stick surface of the toaster. Instead, use wooden or silicone tongs to safely retrieve your toast.
When not in use, store the Hello Kitty toaster in a cool, dry place away from direct sunlight. This will prevent any discoloration or damage to the toaster’s exterior.
Periodically check the power cord and plug for any signs of damage. If you notice any frayed wires or loose connections, stop using the toaster immediately and have it repaired by a professional.
Not only is the Hello Kitty toaster a cute and functional addition to your kitchen, but it can also be a versatile tool for creating delicious and fun recipes. Here are a few Hello Kitty-themed recipes that you can try with your Hello Kitty toaster:
This recipe is a simple and delicious way to showcase the Hello Kitty shape on your toast. Here’s how you can make it:
Ingredients:
Instructions:

Take your Hello Kitty toaster to the next level by using it to make delicious Hello Kitty bagel pizzas. Here’s how:
Ingredients:
Instructions:
Put a Hello Kitty twist on a classic breakfast favorite with this Hello Kitty French toast recipe:
Ingredients:
Instructions:
Here are some reviews from users who have purchased and used the Kitty toaster:
“I absolutely love my Kitty toaster! It adds a playful and cute element to my kitchen. Plus, it toasts my bread perfectly every time.” – Mary S.
“I bought this toaster as a gift for my daughter, who is a huge Hello Kitty fan. She loves it and uses it every day for her breakfast. It’s not only adorable but also works great!” – Lisa T.
“The Hello Kitty toaster is a fun addition to my kitchen. It’s simple to use and makes perfect toast. The removable crumb tray also makes cleaning a breeze.” – John D.
Here are some frequently asked questions about the Kitty toaster:
A: Yes, you can toast frozen bread or bagels in the Kitty toaster. However, you may need to adjust the toasting time to ensure they are heated through.
A: The Hello Kitty toaster is generally safe for children to use, but adult supervision is recommended, especially when handling the toaster and removing hot toast.
A: It is not recommended to use the Kitty toaster to toast non-bread items, as it may cause damage to the toaster and pose a fire hazard.
A: The warranty coverage for the Hello Kitty toaster may vary depending on the manufacturer. It is recommended to check the product packaging or contact the manufacturer for warranty details.

The Hello Kitty toaster is a cute and functional addition to any kitchen. With its adorable design and user-friendly features, it brings a touch of whimsy to your daily toasting routine. Despite some potential drawbacks, the Hello Kitty toaster is loved by Hello Kitty fans of all ages and makes a fun and practical gift. So, if you’re a Hello Kitty enthusiast or know someone who is, don’t miss out on the opportunity to add this delightful appliance to your kitchen!
The Hello Kitty toaster is not only a cute and whimsical addition to your kitchen but also a functional and practical appliance. With its user-friendly features and wide variety of designs, it’s a must-have for Hello Kitty enthusiasts of all ages. By following the tips provided in this article, you can enjoy perfectly toasted bread and ensure the longevity of your Hello Kitty toaster. So, why wait? Get your Hello Kitty toaster today and start your mornings with a touch of cuteness!
The Hello Kitty toaster is not only a cute and functional appliance for your kitchen, but it can also be a versatile tool for creating delicious Hello Kitty-themed recipes. Whether you’re making Hello Kitty toast, bagel pizzas, or French toast, the Hello Kitty toaster adds a touch of cuteness to your meals. So, get creative in the kitchen and let the Kitty toaster inspire you to make fun and tasty treats. Enjoy the process of creating Hello Kitty-shaped toast and delight in the smiles it brings to your family and friends. Happy toasting!
Contents
hide